The current issue of Mainsheet has an excellent article by Jim Gienko about enhancing the insulation in the refrigerator and freezer. He graciously emailed me a copy of his write up several months ago and I've completed the project.
So far, I'm very encouraged with the results. Previously my compressor ran 80 - 86 % of the time. With ambient temperatures ranging from the low to mid 80's during the day and low 60's at night I just recorded compressor run times of 54%. This is much closer to the theoretical 50% run time quoted by Waeco.
As Jim points out in his article, this project isn't for the faint of heart. I didn't find it terribly difficult technically but it was very tedious and requires lots of patience when fitting the fiberglass panels in order to achieve an aesthetically pleasing result. I probably spend 50 hours on the project spread over 3 weeks.
My refrigerator door was different than Jim's - it has a stainless steel shell with a molded plastic liner. This liner had only 3/4" of insulation! I ended up removing the liner and replaced it with 2" of polystyrene , a layer of radiant barrier and covered the inside with the fiberglass liner used in the rest of the project.
If you decide to undertake this project, the full write up in Microsoft Word format and some excellent pictures can be found at https://docs.google.com/document/d/18qb ... ue&sd=true
I found myself constantly referring to the pictures as I worked through the project. Beware, this is a big (36 mb) download so it may take a while depending on your Internet connection.
The
I again want to thank Jim for undertaking this project and patiently answering my questions.
Mark I Refrigeration Insulation Upgrade
Moderator: KenKrawford
-
KenKrawford
- Posts: 614
- Joined: Wed Nov 02, 2005 8:54 pm
- Location: Atlanta, GA
Mark I Refrigeration Insulation Upgrade
Ken Krawford
Message Board Moderator
C350 # 351
Lake Lanier, GA
Message Board Moderator
C350 # 351
Lake Lanier, GA
-
william vanwagoner

- Posts: 112
- Joined: Wed Nov 02, 2005 8:59 pm
- Location: Destiny #229 Long Beach CA
Re: Mark I Refrigeration Insulation Upgrade
Ken,
I am very interested in what you did, and would appreciate any photos etc. you can provide. I have not yet recieved my Mainsheet with the article you speak of, but look forward to it.
Thanks,
Bill Van Wagoner#229
wvanwagoner@verizon.net
I am very interested in what you did, and would appreciate any photos etc. you can provide. I have not yet recieved my Mainsheet with the article you speak of, but look forward to it.
Thanks,
Bill Van Wagoner#229
wvanwagoner@verizon.net
Bill VanWagoner
Destiny #229
Destiny #229
-
saileagleswings
- Posts: 46
- Joined: Mon Sep 10, 2007 8:46 am
- Location: Punta Gorda Fl
- Contact:
Re: Mark I Refrigeration Insulation Upgrade
Ken,
Could you forward me the information on the refrigerator insulation. thanks
richard collins
s/v Eagleswings Catalina 350 #37
email saileagleswings@yahoo.com
Could you forward me the information on the refrigerator insulation. thanks
richard collins
s/v Eagleswings Catalina 350 #37
email saileagleswings@yahoo.com
-
davidjohnson708
- Posts: 12
- Joined: Tue Nov 22, 2005 2:06 pm
- Location: Beaufort, NC
Re: Mark I Refrigeration Insulation Upgrade
Hi Ken,
I am also interested in your material as I am getting frustrated with the fridge run times. Thanks in advance.
Lyle Hanna
S/V Serenity Hull #363
I am also interested in your material as I am getting frustrated with the fridge run times. Thanks in advance.
Lyle Hanna
S/V Serenity Hull #363
Last edited by lyle on Sun Aug 02, 2009 10:38 am, edited 1 time in total.
-
Windseeker
- Posts: 41
- Joined: Thu Jun 04, 2009 10:16 pm
- Location: Queenstown, MD
Re: Mark I Refrigeration Insulation Upgrade
Ken,
This looks like the ticket. The only drawback is losing interior space. I am reluctant to give up any space that could otherwise be used for cold beer! Before I tackle this one, I was wondering if anyone has taken out the panel between the cabin and the cockpit locker? I was thinking if I could reach spaces around the fridge, then maybe I could spray foam insulation into the space. Like Great Stuff or something similar. I do not want to waste my time if you guys have looked at that and it is a non-starter. Any thoughts on this?
Thanks,
Mark
This looks like the ticket. The only drawback is losing interior space. I am reluctant to give up any space that could otherwise be used for cold beer!
Thanks,
Mark
s/v: Wind Seeker
Hull #75
Chester River - Chesapeake Bay
Hull #75
Chester River - Chesapeake Bay
-
KenKrawford
- Posts: 614
- Joined: Wed Nov 02, 2005 8:54 pm
- Location: Atlanta, GA
Re: Mark I Refrigeration Insulation Upgrade
Mark,
I have not removed the panel between the locker and cabin. My guess is that there is not enough room for more insulation. I also hated to lose the storage space in the box but I feel that by reducing the volume of the box, the refirgeration unit is now more effective since it is effectively cooling a smaller (and better insulated) space.
I have not removed the panel between the locker and cabin. My guess is that there is not enough room for more insulation. I also hated to lose the storage space in the box but I feel that by reducing the volume of the box, the refirgeration unit is now more effective since it is effectively cooling a smaller (and better insulated) space.
Ken Krawford
Message Board Moderator
C350 # 351
Lake Lanier, GA
Message Board Moderator
C350 # 351
Lake Lanier, GA
-
Windseeker
- Posts: 41
- Joined: Thu Jun 04, 2009 10:16 pm
- Location: Queenstown, MD
Re: Mark I Refrigeration Insulation Upgrade
Thanks Ken!
I might try this first. 50 hours is a lot of time for me. Although, I agree, no doubt, the added insulation would be a major factor in improving this problem. I added a digital thermometer to the cold plate and can watch the temperature rise faster than the cooling! It's frutrating at best. For you guys in FL, TX, or tropics, it must be insane. I saw the Catalina resonse in that there are too many opinions on this subject to make an official response to the problem. If you have opinons from Novia Sochia to Equador, then, yes, you will not have a concensus. I live in the Mid-Atlantic and I am fit to be tied! Does that mean they leave it up to us to find our own way? I am going to leave it at this: If Frank monitors this site, is he willing to give work instructions for removing the divider panel and adding insulation, or give an opinion on this, or provide a Best Practice Solution? Is the Ken Krawford the only solution? It is a good solution, but is it the only solution. Catalina, Please let us know.
Thanks.
s/v: Wind Seeker
Hull #75
Chester River - Chesapeake Bay
Hull #75
Chester River - Chesapeake Bay
Re: Mark I Refrigeration Insulation Upgrade
Ken's solution is the best that we have thus far. As to removing the panel in the locker, call Catalina, perhaps Warren Pandy in Clearwater, and ask about the benefit of removing this panel.
I have discussed situation this with Pandy, and they do not have a better solution at Catalina. There is no easy fix, and we decided that putting together a "kit" from Catalina was not practical, nor cost efficient.
I personally plan to improve the insulation, and then fiberglass over this. I will share this with the group when I do this in couple of months. I think it will be a lot easier than cutting the plastic panels to size. We shall see.
-
william vanwagoner
- Posts: 112
- Joined: Wed Nov 02, 2005 8:59 pm
- Location: Destiny #229 Long Beach CA
Re: Mark I Refrigeration Insulation Upgrade
I am very interested in your effort to do fiberglass as an alternative to cutting pieces and gluing them in. In your discussions with Warren Pandy, was the possibility of removing the countertop above the ice box discussed. Though likely not minor surgery, if the countertop could be lifted off, presumably a one-piece fiberglass insert with insulation behind it could be dropped in followed by replacement of the countertop.
Bill Van Wagoner #229
Bill Van Wagoner #229
Bill VanWagoner
Destiny #229
Destiny #229
Re: Mark I Refrigeration Insulation Upgrade
Yes, I asked Warren about removing the counter top. He said no, no way, so i left it at that. I did also ask about the old "fiberglass mold" from the Mark I, and yes, he found this for me. I asked if I could borrow it, and he said yes. The idea was to barrow the mold and use it as a "model" if any of us would find a need for this. I originally thought that by barrowing it, I could make paper templates for our units, and then have these for all to use. This idea was later nix'ed as not practical, or workable.
My plan is to add the insulation, fiberglass over it, and then fair it to a smooth surface, then exopy paint it with something glossy and scrubable. Details to follow.... maybe in Sept.
My plan is to add the insulation, fiberglass over it, and then fair it to a smooth surface, then exopy paint it with something glossy and scrubable. Details to follow.... maybe in Sept.
Re: Mark I Refrigeration Insulation Upgrade
I picked up the mold for the fridge from catalina yesterday, saw Warren Pandy and Gerry Douglas while there. I don't know how I'm going to use it yet, but i'll take pictures as I go. Thinking about using it to size everything, then install the pcs in the boat, and fiberglass the seams, give it a top coat. I'll write it all up when done .. several weeks away though. Forgot how to post pics, so hope this works:
http://i40.photobucket.com/albums/e235/ ... 0_3489.jpg[/img]
http://i40.photobucket.com/albums/e235/ ... 0_3489.jpg[/img]
-
KenKrawford
- Posts: 614
- Joined: Wed Nov 02, 2005 8:54 pm
- Location: Atlanta, GA
Re: Mark I Refrigeration Insulation Upgrade
Triumph,
If you follow through with your plan of adding insulation to the mold and glassing over it, how will you install this new piece if removing the counter top is not feasible?
If you follow through with your plan of adding insulation to the mold and glassing over it, how will you install this new piece if removing the counter top is not feasible?
Ken Krawford
Message Board Moderator
C350 # 351
Lake Lanier, GA
Message Board Moderator
C350 # 351
Lake Lanier, GA
-
william vanwagoner
- Posts: 112
- Joined: Wed Nov 02, 2005 8:59 pm
- Location: Destiny #229 Long Beach CA
Re: Mark I Refrigeration Insulation Upgrade
I wonder the same thing. I also can't help but wonder why the countertop cannot be removed. I thought Catalinas were designed to make everything user-serviceable and removable. Even if it is a difficult job, it would be nice if Catalina could provide instructions about how to remove the counter as it would make a refrigeration retrofit so much easier and neater.
Bill Van Wagoner #229
Bill Van Wagoner #229
Bill VanWagoner
Destiny #229
Destiny #229
Re: Mark I Refrigeration Insulation Upgrade
Ken, I will only use the mold to size and fit what I install on the boat. (onece I confirm exact dimensions) I may "pre-glass" some of the flat panels, that is, cut the insulation and glass over it, prior to installing in the boat. Small openings will probably cause the larger curved piece to be made in sections. Once in, I plan to glass over all the seams, then fare, and smooth the furface.
Re: Mark I Refrigeration Insulation Upgrade
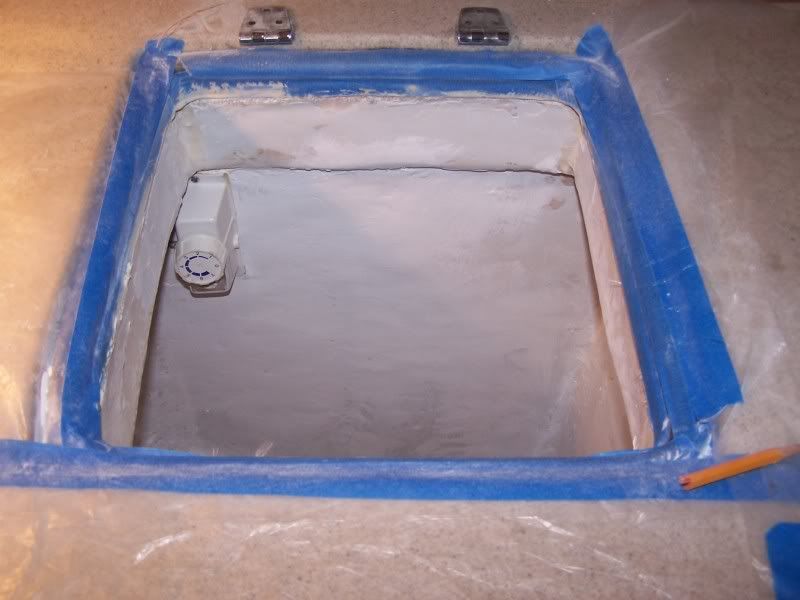
To all Mark 1 owners with the poorly insulated ice box … I have now just about completed the upgrade on my box. I installed a ¼” radiant barrier, one inch polystyrene, and then I fiber glassed over everything. Here are a few comments;
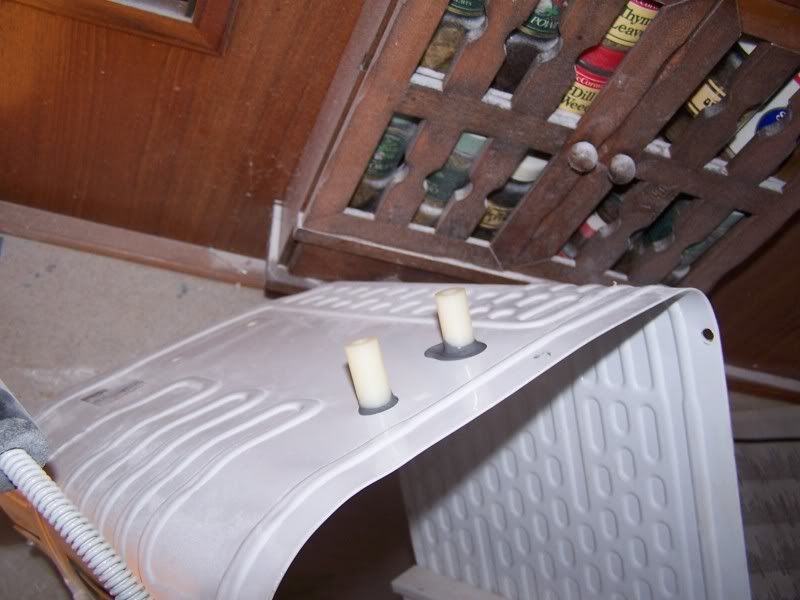
1. Removing the evaporator unit was easy as Jim describes in his article. Getting it back in the box was more difficult because of the tighter fit, but it went relatively easy.
2. Reattaching the evaporator to the box. Jim’s article made me think long and hard. I do not own a 90 degree drill either. What I discovered were four attachment holes on the top of the unit, in addition to the four on the side. I used the two back top holes (forward in boat), and the two outer or aft holes in the side to reattach the evaporator. My drill and screw drivers all fit into the box for this, making it much easier. I glued the spacers to the top of the evaporated before putting it back in the box. This held them in place, while I drilled and screwed up thru them.
3. Installing the radiant barrier and insulation using 3M 77 spray adhesive was pretty easy. I pretty much fit it in place on the boat. With the 1” insulation, it’s easy to cut, and piece in. I started off with large pcs make from the factory mold that I was loan, but ended up breaking these up to fit into place. If I measured short, I’d just cut a small pc of foam, and wedge it into the space. Insulating the box was the easy part of the project.
4. Doing the glass work. I used a combination of the matt, and the woven cloth. I wasn’t sure which would be better to work with. Answer, the matt was easier to work with. It was messy, and trying to get a really smooth surface was not easy. It’s probably going to be one of those things where I’m the only one to notice the bumps here and there. Overall, it’s pretty good. On the other hand, I left it kind of rough and somewhat ugly in the area hidden by the evaporator unit. This was the hardest place to work, and no one would see it it anyhow, so I didn’t finish this are too well.
5. I installed a small 1” pc of pvc pipe as an extension to my drain hole, and glassed in around this. So I still have a functioning drain in the box.
Here’s my thought for you for a quick, and easy fix instead of doing it my way, or Jim’s. This method would probably s substantially increase the efficacy of your unit. If I had to do it over, here’s what I’d do…. I would remove the evaporator and plan on replacing it using the method I describe above with the top holes, and aft holes. I would install 1-2” of polystyrene insulation*, and then cover this with the silver radiant barrier material that looks good, is cleanable, is replaceable, and will add additional insulation. I would leave this radiant barrier as the finished material inside the box. The radiant barrier I’m talking about is available at Lowe’s, not Home Depot. I think it was $30 for 25 feet long by 36” across. Enough for two boxes.
This idea of the radiant barrier as your finish surface may sound odd, but trust me, it looks good. It is also very, very easy to cut and press into place using the spray adhesive. On the lids to my box, I glassed the insulation in, then put this radiant barrier over the top as the finish surface.
I’ll be running tests on my unit soon, and will post the results. In addition, I’ll have more pcs available to anyone who requests them .
*As Jim describes, use ½” insulation around the evaporator to allow room for air circulation.

 [/img]
[/img]
[/img]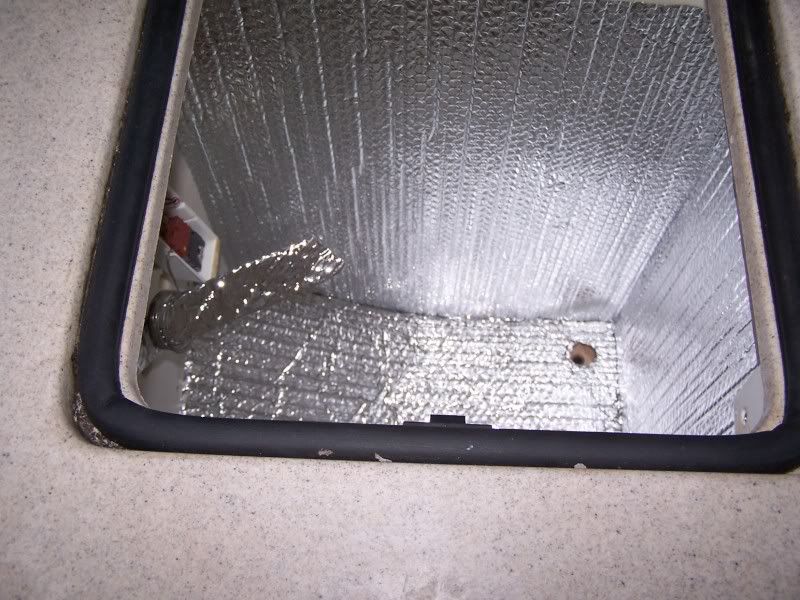
1. Removing the evaporator unit was easy as Jim describes in his article. Getting it back in the box was more difficult because of the tighter fit, but it went relatively easy.
2. Reattaching the evaporator to the box. Jim’s article made me think long and hard. I do not own a 90 degree drill either. What I discovered were four attachment holes on the top of the unit, in addition to the four on the side. I used the two back top holes (forward in boat), and the two outer or aft holes in the side to reattach the evaporator. My drill and screw drivers all fit into the box for this, making it much easier. I glued the spacers to the top of the evaporated before putting it back in the box. This held them in place, while I drilled and screwed up thru them.
3. Installing the radiant barrier and insulation using 3M 77 spray adhesive was pretty easy. I pretty much fit it in place on the boat. With the 1” insulation, it’s easy to cut, and piece in. I started off with large pcs make from the factory mold that I was loan, but ended up breaking these up to fit into place. If I measured short, I’d just cut a small pc of foam, and wedge it into the space. Insulating the box was the easy part of the project.
4. Doing the glass work. I used a combination of the matt, and the woven cloth. I wasn’t sure which would be better to work with. Answer, the matt was easier to work with. It was messy, and trying to get a really smooth surface was not easy. It’s probably going to be one of those things where I’m the only one to notice the bumps here and there. Overall, it’s pretty good. On the other hand, I left it kind of rough and somewhat ugly in the area hidden by the evaporator unit. This was the hardest place to work, and no one would see it it anyhow, so I didn’t finish this are too well.
5. I installed a small 1” pc of pvc pipe as an extension to my drain hole, and glassed in around this. So I still have a functioning drain in the box.
Here’s my thought for you for a quick, and easy fix instead of doing it my way, or Jim’s. This method would probably s substantially increase the efficacy of your unit. If I had to do it over, here’s what I’d do…. I would remove the evaporator and plan on replacing it using the method I describe above with the top holes, and aft holes. I would install 1-2” of polystyrene insulation*, and then cover this with the silver radiant barrier material that looks good, is cleanable, is replaceable, and will add additional insulation. I would leave this radiant barrier as the finished material inside the box. The radiant barrier I’m talking about is available at Lowe’s, not Home Depot. I think it was $30 for 25 feet long by 36” across. Enough for two boxes.
This idea of the radiant barrier as your finish surface may sound odd, but trust me, it looks good. It is also very, very easy to cut and press into place using the spray adhesive. On the lids to my box, I glassed the insulation in, then put this radiant barrier over the top as the finish surface.
I’ll be running tests on my unit soon, and will post the results. In addition, I’ll have more pcs available to anyone who requests them .
*As Jim describes, use ½” insulation around the evaporator to allow room for air circulation.
[/img][/img][/img]-
KenKrawford
- Posts: 614
- Joined: Wed Nov 02, 2005 8:54 pm
- Location: Atlanta, GA
Re: Mark I Refrigeration Insulation Upgrade
Triumph - nice job on the upgrade. I think you'll be happy with the results.
Based on my experience last summer, I'd be hesitant to use the radiant barrier as a final box liner. This problem may have been exaggerated since I live in Georgia but I had quite a bit of water in the bottom of the refrigerator box due to condensation. If you had radiant barrier and nothing to seal the seams, I'm afraid you'd quickly have a mold experiment going on. I wish I had been able to figure out a way to keep my drain functional. It would have made it much easier to deal with the condensation/water.
I dealt with the evaporator standoffs a little different than you and Jim. I cut 3/4" x 3/4" pieces of the PVC used to extend the shelves. I drilled a small hole through the evaporator (carefully avoiding the Freon lines!) next to the original mounting holes and put a screw through the small hole from the inside of the evaporator into the PVC. This held the standoffs firmly in place while I re-mounted the evaporator.
Ken Krawford
Message Board Moderator
C350 # 351
Lake Lanier, GA
Message Board Moderator
C350 # 351
Lake Lanier, GA
-
Hans Grasman
Re: Mark I Refrigeration Insulation Upgrade
I did an upgrade to the refrigerator last year and the unit operates much better. But I now have more condensation coming from the freezer lid and the condensation is turning the wood on the right galley cabinet lid dark.
Your upgrade sounds great. Please let us know the final results after this Florida sailing season and your professional rates to do that on my boat.
My pension check from bankrupt Nortel is to be send to me this month by the US Government as of this evening it has not been deposited to my checking account.
So maybe you will soon see another C350 for sale.
Thanks for your advice during these years to upgrade and maintain our vessels. You are a very helpful contributor.
Re: Mark I Refrigeration Insulation Upgrade
The upgrade of adding insulation to the interior of the box, and glassing over it seems to be working pretty good. We are departing on a two month cruise in the Bahamas later this week, and that will be the real test.
I've been running it at the dock for a week, and it's run time is 35%. This run time might go up when we hit the 80's later spring, but maybe not. I've got the freezer setting on #3, and the freezer temp is 8 degrees. The blow over fan is on 4, and the refrigerator temp is 38-40 degrees. With the 240 watts of solar I added, power consumption by the refrigerator does not seem to be an issue. I think this set up will work well for us, and I'm really happy with the insulation improvements.
I've been running it at the dock for a week, and it's run time is 35%. This run time might go up when we hit the 80's later spring, but maybe not. I've got the freezer setting on #3, and the freezer temp is 8 degrees. The blow over fan is on 4, and the refrigerator temp is 38-40 degrees. With the 240 watts of solar I added, power consumption by the refrigerator does not seem to be an issue. I think this set up will work well for us, and I'm really happy with the insulation improvements.
-
Windseeker
- Posts: 41
- Joined: Thu Jun 04, 2009 10:16 pm
- Location: Queenstown, MD
Re: Mark I Refrigeration Insulation Upgrade
Perhaps I found a compromise solution (for mid-atlantic). I took a Greatest hits from Michael Bourassa, Ken Crawford and other sites and came up with another solution for last early Oct week cruise. I made a home-made vent for the Compressor, reversed the fan and vented the heat outside. I drilled holes and injected foam into the door panels. I injected foam in the gap between the counter top and the cabinet. I bought the foil lined bubble wrap at Lowes and cut out a liner for the fridge and freezer. I used velcro to adhere them so I could take them in and out for cleaning and mold prevention. I also took the bubble wrap and made a top cover for the counter top. It helped alot. Even though it was Fall here in Mid-Atlantic, I could tell it did make a difference. The freezer cold plate was at -1! I clocked it on my phone stopwatch, and was running around 50% duty cycle in early Oct. This year, I am going to double line the bubble wrap insulation and add a real insulation blanket on the top. I think that will work well. It wasn't very expensive, and did not take too much time.
I have a few pictures, but I have no idea on how to put them here.
I have a few pictures, but I have no idea on how to put them here.
s/v: Wind Seeker
Hull #75
Chester River - Chesapeake Bay
Hull #75
Chester River - Chesapeake Bay